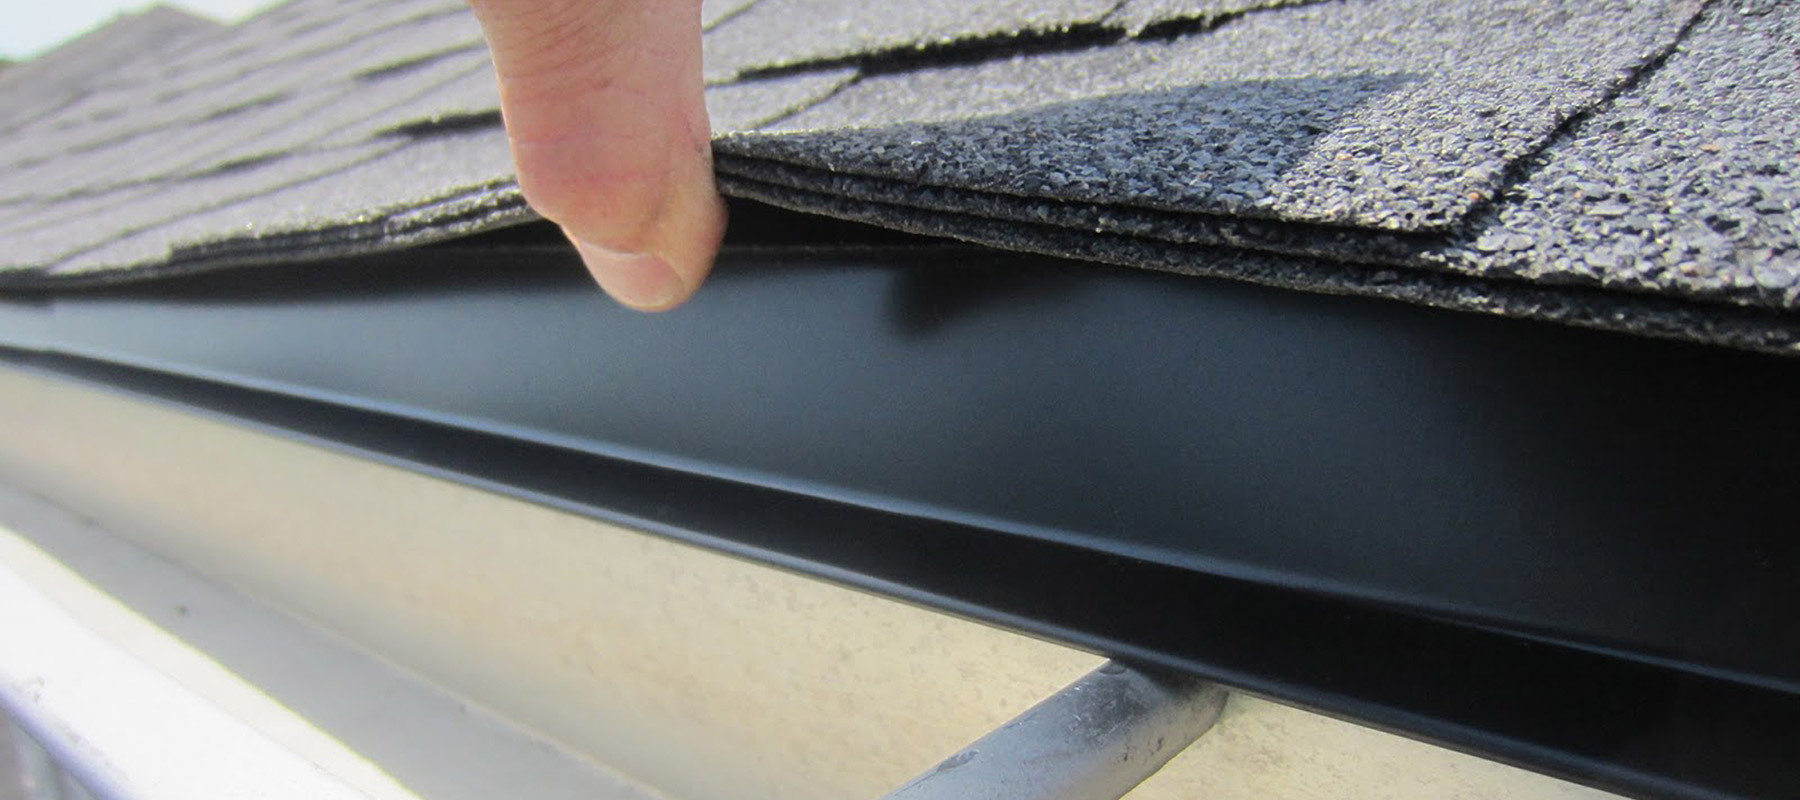
Your roofing system is more than just what you can see from the ground. Beneath the shingles, tiles, or panels are corrosion-resistant materials that ensure the roof can withstand all kinds of weather.
The drip edge is an important part of this. If it’s not functioning properly, you may have to pay for a new roof sooner than you’d like. We’ll outline the different types of drip edges to help you determine which is best for your specific roofing project.
What Are Roof Drip Edges?
A drip edge is an angled piece of metal flashing located at the roof’s edge. It attaches to the roof deck and extends out over the fascia boards, which are the horizontal boards located under the roof’s eaves. Usually, drip edge installation occurs before underlayment, shingles, or other roofing materials are laid down, though in some instances, retrofitting a drip edge to an existing roof may be necessary. Most contemporary building codes require drip edge flashing as part of a roofing system.
What’s the Purpose of Roof Drip Edges?
A drip edge’s primary purpose is to prevent moisture from getting underneath the row of shingles closest to the roof’s eaves, and to direct water away from the fascia and into the gutter.
Without a drip edge, moisture from rain and other precipitation can drip behind the gutters and run down the fascia into the soffit boards, causing water damage to wooden structures and roofing underlayments. This can shorten the roof’s life span. In a worst-case scenario, water can get into your attic or walls, causing further damage regardless of whether you have a shingle, tile, or metal roof.
A drip edge also offers some protection from severe weather. Strong winds can potentially push precipitation up under the lowest row of shingles, but a drip edge prevents wind-driven rain from loosening or corroding these shingles.
Proper water flow is also necessary in cold climates to prevent the formation of ice dams, which put extra stress on a roof and can weaken the structure. Finally, sealing the gap between the roof edge and the fascia can keep insects and other pests from making their homes in these tight crevices.
Types of Roof Drip Edge Material
Roof drip edges are most commonly made of metal since it’s a highly durable material. We’ve outlined the different metal types below.
Aluminum Drip Edges
Aluminum is lightweight and relatively inexpensive at about 30 cents to $1 per linear foot.* It’s not as strong as other metals, but it resists corrosion and is available in an enamel finish in a variety of colors to match your roof.
Galvanized Steel Drip Edges
Galvanized steel costs about the same as aluminum, but it also holds up better against strong wind. Note that all types of steel roof flashing must be galvanized to prevent rust.
Copper Drip Edges
Copper is the most expensive metal used to create drip edges, usually priced at $3.50–$7.50 per linear foot. But, it’s also highly durable and creates a unique appearance.
Non-Metallic Drip Edges
There are also plastic, fiberglass, and vinyl drip edges, though these aren’t durable enough for use on a roof. Instead, they’re typically installed over windows or doors.
Types of Drip Edge Profiles
The different shapes, or profiles, that drip edges come in are named after letters. This can be confusing because the letter type doesn’t always describe the shape very well, so another letter is often used to identify the style.
Type C (L-Style)
A Type C drip edge has the simplest profile—it’s an L-shaped piece of metal bent at a 90-degree angle, sometimes with an additional flange or flare on the bottom edge. Because of its shape, it’s also called an L-style drip edge and is mostly recommended for low-profile roofs. This type usually costs between $0.30 and $1.00 per linear foot.
Type D (T-Style)
Type D is also called T-style because its profile is shaped like the letter T. The top of the T extends further out over the gutter at common roof pitches than the L-style edge, making a Type D drip edge more effective at directing water away from a roof. It’s a little more expensive at $1.00–$1.50 per linear foot, but the Asphalt Roofing Manufacturers Association recommends this type of drip edge for most residential roofs.
Type F
Type F drip edges are similar to Type D, but they have a longer leading edge, which makes them easier to secure over existing shingles. If you need to install a drip edge on a finished roof, Type F is usually what you need. It’s priced similarly to Type C at $0.30–$1.00 per linear foot.
Other Types
The following roof flashing types aren’t technically drip edges, but they serve a very similar function.
- Gravel stops: Protects walls underneath flat or very low-profile roofs.
- Gutter aprons: Similar to Type C drip edges but larger with a wider angle, overhanging farther into the gutters.
- Rake edges: Runs along a roof’s gabled edges (the angled edges without gutters) and can be T-style or L-style. Although precipitation doesn’t typically run directly off these edges, the rake edge ensures any water that reaches it gets directed away from the frieze boards on the house’s side.
Drip Edge Installation
Putting a new drip edge on is easiest if roof replacement is already underway. A roofing contractor can install the drip edge over the roof sheathing before shingles or other surface materials are put in place. This is also the least expensive method since you’ve already hired labor, and a roofing professional can lay a drip edge quickly.
The only reason to avoid installing a drip edge at this stage is to save money, but the savings are minimal compared to the protective function it offers. To maximize your roof’s life span, particularly in areas that receive a lot of rain or snow, you should factor the drip edge into the cost of a shingle roof or the cost of metal roofing.
Installing a drip edge is a little more complicated if you’re retrofitting it to an already-finished roof. This can be a do-it-yourself (DIY) job for homeowners comfortable working on a ladder, but there’s a considerable safety risk. You’ll need to lift up the lowermost row of shingles and fit the drip edge’s leading edge to the roof’s surface.
The other edge should protrude at least 1.25 inches from the fascia. You will likely need someone to hold up the shingles while you secure the drip edge with roofing nails every 12 inches. Make sure the nails are high up enough that they’ll be covered by the shingles. Overlap drip edge pieces by an inch or so, and seal any gaps with roofing cement.
Conclusion
Drip edges direct precipitation away from your roof’s edges and into the gutter, ensuring that water doesn’t pool on the roof or drip down the fascia boards. It’s vital for preventing water damage, pest infestations, and mold and moss. It’s a good idea to install a drip edge if your roof doesn’t already have one. This is easiest while your roof is still being built or replaced, but it can also be installed on a finished roof.
Since this is important to your roof’s structural integrity, we recommend hiring a professional roofing company for the task. Pro roofers can complete the job more quickly and efficiently than you can. Start your search by filling out the form below to get quotes from licensed roofers in your area.
 Lifeyet News Lifeyet News


